“Visualization is also referred to as guided imagery, or the process of creating a scene in the athlete's mind of what she wants to happen. An athlete will create images, like pictures or movies, that recreate her best performances, or she will envision a desired outcome. While imagining these scenarios, the athlete actually imagines every detail and the way it feels to perform just the way she wants.
These images can be visual (images and pictures), kinesthetic (how the body may feel), or auditory (McMahon reported imagining the roar of the crowd). Using the mind, an athlete can call up these images over and over, enhancing her skill through repetition or rehearsal, similar to physical practice. With mental rehearsal, minds and bodies become trained to actually perform the skill imagined.”
Visualizing is a technique used by many pro athletes. although I do not believe Counter Strike is a sport, you can still benefit from the process of visualization.
There are two ways of visualizing; one is while you are actually playing the game, the other is when you are bored in class or where ever.
When playing my spot as a counter terrorist, there is usually only one direction the terrorists can come from. As I sit and wait for them to attack, I visualize how they will appear, and what will happen. I picture their heads coming into view, and how I will spray them down. I repeat this picture in my mind, repeatedly, until I actually have to fire. This keeps me focused and alert.
As a terrorist, before entering any area controlled by counter terrorists, I think of all the possible hiding spots. As I check each one, I act as though they are there - not with prefire, but by thinking about where their body will be, what level their head will be at, and the physical act of shooting them. Before picking a spot, I visualize over and over what it will be like to shoot them. Then, once I actually do shoot, I have already played the scene in my mind dozens of times.
When you are not at your computer, you can still practice. Think about sitting in your chair, playing Counter Strike. The more details you think of, the more effective it will be. You can visualize playing a particular spot, much like you do when you are actually in game. Or, you can think about how your terrorist strategies flow, and what you have to do in each one.
Controlling your shot
The first step in controlling your shot is having your cross hair at the correct position. When moving around the map, your cross hair should remain at head level, and be positioned exactly where your enemies heads will appear. This lessens the time you will have to spend aiming.
The way you shoot your weapon depends both on the type of gun it is, and also the distance. For this reason, I will talk about individual weapons, and how to shoot them at different distances, starting with the pistols.
Short range would be top of stairs on dust2 to bottom of stairs
Medium range is from B double doors on dust2 to where the terrorists enter the site.
Long range is top of long a to pit.
GLOCK
Short range, enemies has no armor: My preference here is to circle them while quickly tapping the fire button. The glock has almost no recoil at close range, and if you hit them in the head they won't be able to fire.
Short range, armor: What my team normally did on save rounds without deagles was the monkey jump. You go to some part of the map where the CTs are forced into close quarters combat, then you burst fire your glocks while jumping.
Medium range: You can still quickly tap on the fire button, but you should avoid moving too much
Long range: The glock sucks at this distance. If the enemies has armor, it can do as little as 3 damage a hit. Try to get closer, either by running towards them while snaking back and forth, or by finding another point of entry. If you must shoot from this distance, duck and space your shots by about 1/2 a second. You must aim for the head, or else you will never kill them
USP
Short range: You can move a bit. If you are aiming for the head, space your shots by about 1/3 of a second. If you aim for the body, spam your shots as fast as possible.
Medium range: Stand still, possibly duck if you do not need the mobility. Shots should be fired at about 1 a second, aiming for the head. If you do spam the USP, your cross hair should be on the low part of their chest as you reach the end of your spam.
Long range: Same as medium, but don't spray. Take time to count out a second between shots (in your head, not out loud unless you want your teammates to kill you).
DEAGLE
Short range: You can strafe around them. If your first shot misses, you should lower your aim to their shoulders. If you don't get them in the first two shots, spray your deagle at their body.
Medium range: Don't move, either strafe back and forth and fire shots on the pauses, or duck for maximum accuracy. Shots should be paced at about a second each. Take the time to aim before shooting.
Long range: You cannot kill with a single shot at very long ranges, and body shots will take 4 or more to kill. Try to get closer, or if you must shoot from such a distance, duck
COLT
Short range: You can run and shoot the first 5-10 bullets of your spray, then you should duck and finish the spray. When doing an extended spray, pull your cross hair to around their navel, and wiggle your mouse back and forth.
Medium range: You can usually run with the first 3 bullets, but no more then that. I recommend that you do not move at all. Spray about 5 bullets, strafe to your left or right, then duck spray the rest of your bullets if you need to. Once again, wiggle your mouse while spraying.
Long range: Strafe back and forth while shooting 3 shot bursts. It is possible to spray at this range, but only if you have very good control, and even then it is not that accurate.
AK-47
Short range: Same as colt, but you have to pull down farther, and shouldn't move while shooting except the first 3 bullets.
Medium range: Don't move. Start with a standing spray for your first 5, then duck to pull your shot into their head and wiggle your cross hair around their kneecaps.
Long range: same as colt, but no spraying
AWP
I don't AWP very much, so I am only going to talk about one thing. Too many people attempt to quickscope at close range. When you are in the lower leagues, you often have time to allow your gun to scope and to aim. Take this time to do so, because otherwise you end up firing 2-3 shots before dying, when you could have just killed them right away with a well aimed shot.
As an added bonus, here are some rules I typed up over 3 years ago, when I was still playing 1.6. They aren't hard and fast, but they can be helpful
RULES FOR NOT SUCKING AT COUNTER STRIKE:
DO NOT MESSAGE MODE ONE. I DON'T CARE IF THEY CALLED YOU A HACKER, OR IF THEY SUCK. ONLY CHILDREN USE MESSAGE MODE ONE. IF THEY ARE BEING E-THUGS, LET THEM. IT DOESN'T MATTER.
1. At the beginning of each round in which the previous round was lost, do not buy. Instead, type how much money you have. Then, if the strategy caller calls buy, you buy.
2. Listen to the strategy. Do not talk at the beginning of the round. Whatever happened in the last round doesn't matter anymore, and don't yell at people for what they did wrong unless you are the strategy caller.
When throwing a flash bang, and other people are around you, say you are throwing it. No one likes to be blinded because you suck at throwing flash bangs or you threw it just as they peaked.
3. When CT, type a strategy for your site to follow. Each site should have a leader who calls strategies for that site. strategies should be gone over before scrims
4. Do NOT push. If you do push, say you are pushing, and say where you are pushing to. If you abandon your spot, say that you are leaving it. If people can get past you, say so. Getting shot from behind sucks, so lets try and prevent it.
5. If they are rushing, call a rush. Call how many people are there, and if you see the bomb. If you rotate to help someone, say you are rotating. Do not rotate unless bomb is called. Call before you are dead, not after.
6. When retaking a site, wait for everyone to be ready to enter the site. Throw flash bangs, and then rush the site together. If you start defusing, make sure someone is ready to cover you. Do not assume that they are covering you unless they say they are.
7. Gun>Defuse>greNades>Armor. If you have a choice between a defuse kit or head armor, get the kit.
8. As T, follow the strategy exactly. If the strategy calls for 2 long and 3 cat, type where you are going. Do not do whatever you like unless you ask the strategy caller if you can. Do not attack any site without telling people what you are doing. When you are going into a site, Flashes+smokes+nades into common hiding places
9. Once the bomb is planted, you cover a specific spot. Call where you are covering, and listen to where others are covering. Do NOT peek. Ever. Wait for them to start defuses, and then you peek and kill them, or get them to stop defusing.
10. Unless the strategy was called as a rush, walk. Don't switch to your knife or grenades, because both make noise.
11. When picking, pick together. Flash+peek as a team. Don't do it stupidly (AKA line up), but one guy jumps out and the other guy strafes out. If you are awping, then there should be someone with an AK-47 with you to back you up.
12. DO NOT BAIT YOUR TEAMMATES.
13. If the strategy is to rush, you rush. I don't care if you are blind. You keep bleeping running. I do not want 2 people to rush in and die, then 1 person goes in late, then the last 2 mosey in. This rule goes with number 12.
14. At the end of the round, don't shoot your teammates. If this kills them, they are going to be pissed.
15. I don't care if you are lagging. I don't care if your dad was talking to you. I don't want to hear excuses. Either you made the shot or you didn't. If you did, good job. If you didn't, I don't care but you better not waste my time telling me why you didn't.
16. Once you are dead, you do not talk on vent. Don't tell someone what they should be doing. If they die because they messed up, then it will stick in their mind better.

Saturday, February 2, 2008
What is a good effective practice schedule? For an individual player..
What is a good effective practice schedule? For an individual player..
This is a very good question, though a lot of it will depend on how much time you have available, what your goal is and what said player needs to improve upon. The topic of individual improvement has a lot to do with aiming, but I really don't want to get into that right now, so I wont go over the specifics but instead I'll give you a general idea of how practice should work for an individual.
• Set a time schedule, and stick to it.
This is easily the most important part of developing yourself as a player. It's extremely easy to cheat your schedule and start late, or justify skipping it entirely with arguments like "I played longer than I was supposed to yesterday, so It'll be fine." It's all too easy for one day to turn into two, turn into three, and eventually you're off your schedule all together. Set a time to start and end practice, write down your goals for the practice (improve aim by doing X, improve smarts by doing X, improve nade mechanics by doing X, etc...) and stick to them.
• Track your progress
It's way too easy to give up on something you're doing, because you don't see any immediate results. You have to track your progress to fully understand what direction you're going, and make the right tweaks to your regiment to maximize the time you have available. A simple way to track progress in aiming, would be to find an aiming game with end-game values that you can compare on the weekly. Intelore's Reflex is a good example (http://files.filefront.com/Reflex+game/;.. Now, this isn't a direct evaluation of how good you are in game, because this is not a fully 3D test with the same sensitivity, but it's safe to say that your improvements in game will correlate to some degree out of game in these types of tests and tracking systems.
Note: This test has some issues at times with faster computers, and may make the targets instantly appear. If this happens, just restart the game a few times (happens about 1 every 10 times you play). You can also go to the start menu, and launch the soundless version of the game to play with your own music.
• Understand what it means to practice
Let's assume you dedicate a three hour block of your day to getting back to where you were as an individual player. First of all, this is practice time. This doesn't mean this will be the only time you'll be playing CS, simply that this is the time dedicated to your improvement, above all else. This isn't about enjoying yourself, though it's fine if you do. If you're really serious about achieving a goal, you have to play to improve, not to have fun. There will be plenty of time to have fun later. Be sure you practice with the methods that you've come to understand as the best ways to improve different aspects of yourself as a player, not necessarily the methods that are the most common or most fun.
When you burst with ak should you let the crosshair come all the way back to its small orig size or should you not wait and shoot again when the crosshair is like medium size.
Aiming based on your crosshair is a bad idea when it comes to dealing with recoil. It's the direction of impact (bullets) that you want to be paying attention to. Off of the top of my head, and explaining it the best way I can, you can do a normal burst of 2-4 bullets, drag and tap two or three times with the taps remaining pretty accurate, but you really don't want to focus on the crosshair at all. Also, it would be a good idea to quick tap rather than burst in most situations, since it locks your opponents up better and just as accurate, albeit a bit slower. Burst when you feel you've got the aim to not miss, or the situation warrants it.
When peeking around a corner and seeing like 3 guys there i always go crazy and spray in their general area while backing away quickly hitting nothing how do i fix that?
What that tells me, is that you weren't expecting the opponent to be there. If you were, you wouldn't be taken by surprise obviously. Start thinking further ahead, and if you're in a situation where you wont have time to take cover and there are multiple enemies, concede you're going to die and focus on the easiest target, and then the next easiest and so on for as long as you are alive.
How do i learn how to track moving targets?
Through repetition. Lots and lots of repetition.
This is a very good question, though a lot of it will depend on how much time you have available, what your goal is and what said player needs to improve upon. The topic of individual improvement has a lot to do with aiming, but I really don't want to get into that right now, so I wont go over the specifics but instead I'll give you a general idea of how practice should work for an individual.
• Set a time schedule, and stick to it.
This is easily the most important part of developing yourself as a player. It's extremely easy to cheat your schedule and start late, or justify skipping it entirely with arguments like "I played longer than I was supposed to yesterday, so It'll be fine." It's all too easy for one day to turn into two, turn into three, and eventually you're off your schedule all together. Set a time to start and end practice, write down your goals for the practice (improve aim by doing X, improve smarts by doing X, improve nade mechanics by doing X, etc...) and stick to them.
• Track your progress
It's way too easy to give up on something you're doing, because you don't see any immediate results. You have to track your progress to fully understand what direction you're going, and make the right tweaks to your regiment to maximize the time you have available. A simple way to track progress in aiming, would be to find an aiming game with end-game values that you can compare on the weekly. Intelore's Reflex is a good example (http://files.filefront.com/Reflex+game/;.. Now, this isn't a direct evaluation of how good you are in game, because this is not a fully 3D test with the same sensitivity, but it's safe to say that your improvements in game will correlate to some degree out of game in these types of tests and tracking systems.
Note: This test has some issues at times with faster computers, and may make the targets instantly appear. If this happens, just restart the game a few times (happens about 1 every 10 times you play). You can also go to the start menu, and launch the soundless version of the game to play with your own music.
• Understand what it means to practice
Let's assume you dedicate a three hour block of your day to getting back to where you were as an individual player. First of all, this is practice time. This doesn't mean this will be the only time you'll be playing CS, simply that this is the time dedicated to your improvement, above all else. This isn't about enjoying yourself, though it's fine if you do. If you're really serious about achieving a goal, you have to play to improve, not to have fun. There will be plenty of time to have fun later. Be sure you practice with the methods that you've come to understand as the best ways to improve different aspects of yourself as a player, not necessarily the methods that are the most common or most fun.
When you burst with ak should you let the crosshair come all the way back to its small orig size or should you not wait and shoot again when the crosshair is like medium size.
Aiming based on your crosshair is a bad idea when it comes to dealing with recoil. It's the direction of impact (bullets) that you want to be paying attention to. Off of the top of my head, and explaining it the best way I can, you can do a normal burst of 2-4 bullets, drag and tap two or three times with the taps remaining pretty accurate, but you really don't want to focus on the crosshair at all. Also, it would be a good idea to quick tap rather than burst in most situations, since it locks your opponents up better and just as accurate, albeit a bit slower. Burst when you feel you've got the aim to not miss, or the situation warrants it.
When peeking around a corner and seeing like 3 guys there i always go crazy and spray in their general area while backing away quickly hitting nothing how do i fix that?
What that tells me, is that you weren't expecting the opponent to be there. If you were, you wouldn't be taken by surprise obviously. Start thinking further ahead, and if you're in a situation where you wont have time to take cover and there are multiple enemies, concede you're going to die and focus on the easiest target, and then the next easiest and so on for as long as you are alive.
How do i learn how to track moving targets?
Through repetition. Lots and lots of repetition.
Friday, February 1, 2008
Complete high quality counter strike source Movie Making Guide
Table of Contents:
----------------------------------------------
1. Movie Config
2. HQ Movie Files
3. Before You Get Started
A. Separate CSS Icons
B. Enabling Visible File Extensions
C. Windows Sound Settings
D. Video Card Driver Settings
--Nvidia
--ATI
4. Encoding and Compiling Files Section
-Includes Links to All Freeware:
--VirtualDub
--Windows Media Encoder
--HuffYUV
--VLC Media Player (x264 Playback)
--x264 Encoding File Pack by anX
--Xvid Encoding File Pack by anX
5. Recording in CS:S
6. Screenshots to avi in VirtualDub
7. Editing Program to Uncompressed Master File(s)
A. Sony Vegas to Combined Uncompressed Video and Audio for wmv
B. Sony Vegas to Separate Uncompressed Video and Audio for x264 or Xvid
C. Adobe Premiere to Combined Uncompressed Video and Audio for wmv
D. Adobe Premiere to Separate Uncompressed Video and Audio for x264 or Xvid
8. Encoding
A. Windows Media Encoder for wmv
B. FAAC, MEGUI, and more for x264
C. LAME, VirtualDubMod, and more for Xvid
1. Movie Config v2.3:
Download: http://files.filefront.com/movieconf.../fileinfo.html
I definately spent the most time working on this. It contains all your basic movie commands (hides radar, text, all that), sets all your settings on high, and has a lot of common binds already set up for you. You can toggle wireframe, mat_proxy, hud, radar, spectator bars, you name it.
Screenshot of Console Menu:

2. HQ Movie Files v4:
Download: http://www.filefront.com/16774927/cssmoviefiles-anXv4.rar
This movie pack contains the following:
1. A modified version of Fragalicious' HUD remover (www.csflicks.net). The original changed the kill notice text and
gave it a shadow. I changed it back to default.
2. The materials folder and blue LED bomblight from ARN's CSS Movie Making GUI. I did not include the GUI's hud remover because the clientscheme.res changed too many in-game texts. The materials folder includes high quality textures, better explosions, and much more. Along with it comes a custom movie making background and a custom movie GUI.
3. Spectator bar removal for POV demos. These are NOT recommended for sourcetv demos, because you can toggle the bars with the movie config. Read the installation section in the readmeon how to enable/disable the spec bar removal.
These files will remove the HUD in CSS and make your game look downright sexy when used with the movie.cfg. It took a while to modify them so the texts in the game are all default, but I think I got it figured out.
NOTE: The HUD toggles in the movie.cfg will not work with these files in use. The HUD is permantly off when using the new scripts and resource folder.
I am not the original creator of the resource, materials, or scripts folder in this pack. I only modified them so that the game had all default texts with maximum settings and high quality materials.
NOTE: After the recent sv_pure update, the high quality materials of these movie files no longer work. The hud remover, however, works just fine.
3. Before You Get Started:
3A. Separate CSS Icons
I recommend using two separate CSS icons on your desktop: one for playing and one for making movies. I would also recommend NOT using an autoexec. Why? Well, you don't want stuff loading from your autoexec as you make movies, and vice versa. If you don't use an autoexec, skip this and go onto "Things you'll want/need."
So, here's what I do. Go to your cstrike/cfg. Open up your config.cfg. Back up any personal commands, then completely empty it. Save it and close the window. Then right click on the file > properties > check the "Read-Only" box. This will prevent things from the movie config saving into there.
Then rename your autoexec.cfg to play.cfg. Make sure you have ALL of your binds in there (for movement and everything).
Now we go to launch options in your two CSS desktop icons. I'll be using defaults for resolution. Change the -w and -h to whatever your res is. You can also change the dxlevel in your play icon to whatever you usually use.
For your play CSS icon:
-fullscreen -w 1024 -h 768 -dxlevel 80 +exec play
For your movie CSS icon:
-windowed -w 800 -h 600 -dxlevel 95 +exec movie
Example:
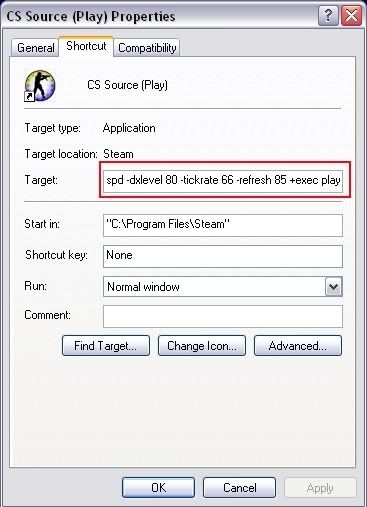
3B. Enabling Visible File Extenstions
Also, I HIGHLY HIGHLY HIGLY recommend enabling file visible file extensions in windows. Actually, it's required for x264 encoding, so just go ahead and do it.
Control Panel (in classic view) > Folder Options > View Tab:
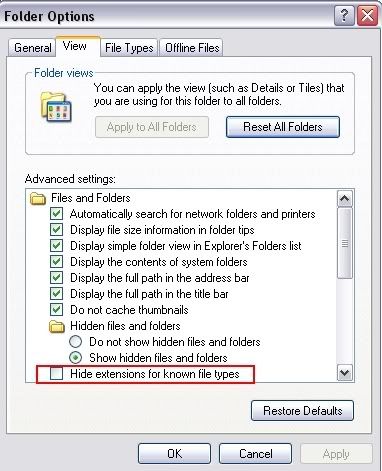
Uncheck that box.
3C. Windows Sound Settings
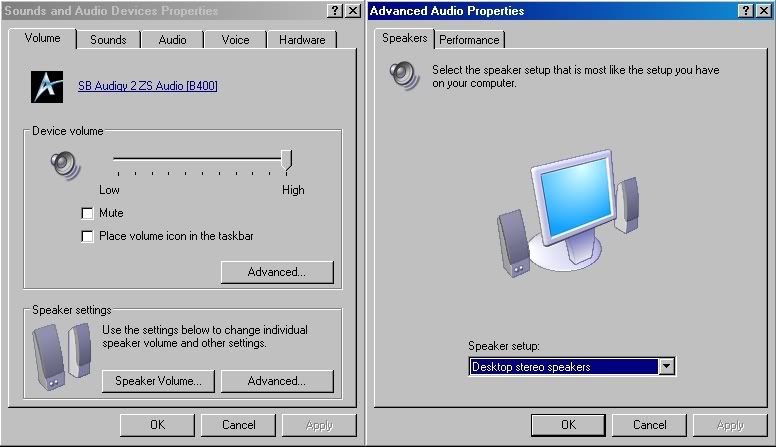
CS:S cannot record surround sound audio. If your audio settings are at 5.1/7.1, the audio file you record will be 0 kb. I recommend using Two Speaker settings. Not only will your audio record, but this is the best audio setting to play at BY FAR unless you're using 5.1/7.1 headphones.
Control Panel (in Classic View) > Sounds and Audio Devices > Volume Tab > Advanced (under Speaker Settings) > Set your Speaker Setup to "Desktop Stereo Speakers"
3D. Video Card Driver Settings
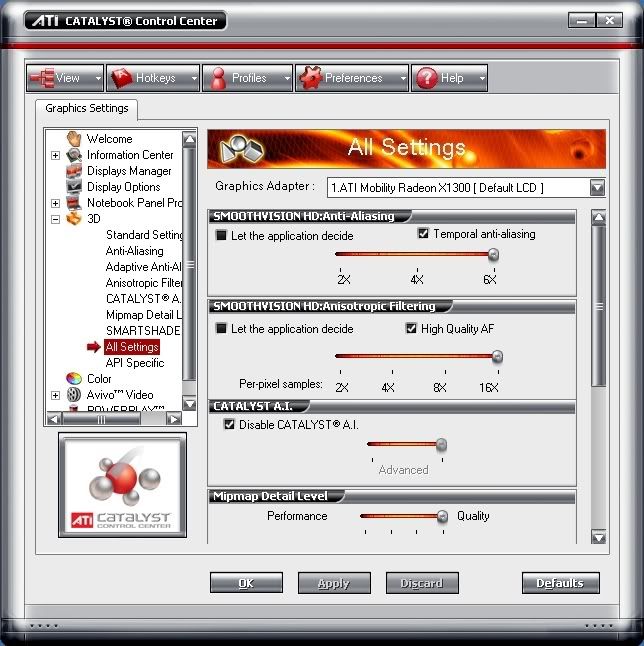
CS:S does not contain commands for maximum AF/AA. For example, the maximum Filtering command in CS:S is mat_trillinear 1. Any mainstream card made in the past couple years can support higher AF than trillinear. Thus, it is best to force maximum settings in your video card drivers
Nvidia (Forceware 84.26):
Right click on your desktop > Nvidia Display > "monitor name" > "video card name" > Performance and Quality Settings: Turn everything up to its maximum, and uncheck any box that says "Let the application decide."
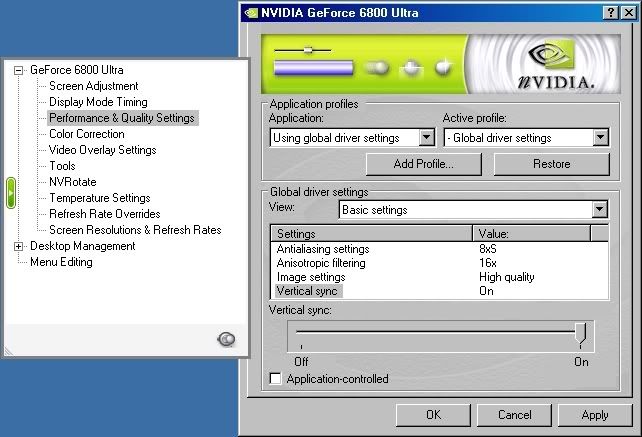
I know these aren't the newest drivers, but newer ones cause some problems with my PC. You should get the idea of what you want to do.
ATI (Catalyst Control Center):
Right Click on your Desktop > ATI Catalyst Control Center > 3D > All settings: Turn everything up to its maximum (excluding Catalyst AI and Smartshader Effects), and uncheck any box that says "Let the application decide."
4. Encoding and Compiling Files Section:
Required non-free Software:
-Counter-Strike: Source
-Sony Vegas or Adobe Premiere (I use Vegas 5)
Freeware:
-VirtualDub (I use version 1.5.10) Download: http://www.oldversion.com/program.php?n=virtualdub
-Windows Media Encoder (for easy wmv files) Download: HERE
-HuffYUV Codec for Lossless Compression Download: http://www.divx-digest.com/software/huffyuv.html
-VLC Media Player (x264 playback) Download: http://www.videolan.org/vlc/
-x264 Encoding Pack by anX Download: HERE
Contents:
---AVISynth 2.5.7
---YAMB 1.6
---FAAC.exe
---meGUI x264 specific version
---meGUI new version (multiple codecs)
---MP4Box.exe
---x264.exe
---A bunch of dlls and other files THAT YOU MUST KEEP IN THE SAME FILE AS THE .exe's.
-Xvid Encoding Pack by anX Download: HERE
Contents:
---AVISynth 2.5.7
---Xvid 1.0 (newer versions are without a few options)
---Xvid Bitrate Calculator
---LAME.exe
---Multifrontend.exe
---VirtualDub 1.5.10
---VirtualDubMod 1.5.10
---A bunch of dlls and other files THAT YOU MUST KEEP IN THE SAME FILE AS THE .exe's.
Optional Sofware:
-Adobe Photoshop
-Adobe After Effects
-3DS Max
-Particle Illusion
5. Recording in CS:S:
After executing the config:
- Hit the down arrow on your keypad to set your capturing rate @ 90 fps (or chose whatever framerate you want).
- Hit F11 to start recording. Hit F12 to stop recording.
- After recording a clip, hit control (host_framerate 0) for functional demoui speed control. Before you record your next clip, don't forget to hit the down arrow key again (or whatever framerate key you used).
All of that stuff should be in your console on the menu I made...
Now there will be a ton of .tgas and one .wav file in your cstrike folder all named a (or b or c or whatever letter you were on. You can record up to 26 times with F11 in one execution of the config. Nothing will ever get overwritten unless you re-exec the config).
Now close css and open up virtualdub.
6. Screenshots to avi in VirtualDub:
With virtualdub open:
- File > Open video file > click on the first ss in your cstrike folder (the whole series will open up
- Video > Framerate > change to whatever framerate you recorded at (90)
- Video > Color depth > decompression format: 24 bit, output format to compressor/display: 24 bit
- Video > compression > uncompressed OR HuffYUV (files section, lossless codec, no quality loss but output size will be less than half than that of uncompressed avi)
- Video > Full Processing Mode
- Audo > WAV audio > browse to your wav file in your cstrike folder
- Audio > Full Processing Mode
- Audio > Compression > Uncompressed
- File > Save as AVI
Done.
7. Editing Program to Uncompressed Master File(s)
7A. Sony Vegas to Combined Uncompressed Video and Audio for wmv:
I use Vegas 5, just for reference. Newer versions might be slightly different.
After you're done editing:
- File > Render As...
Now in your "Render As" window:
- Template: Default Template (uncompressed)
- Save as Type: Video for Windows (.avi)
Then click on the "Custom" button. In your "Custom Template" Window:
- Project tab > Video Rendering Quality: Preview (this will prevent deinterlacing and you will not lose any quality)
- Hit okay. Name it what you want, and hit save.
This is your master file. It's uncompressed audio and video, and you can encode it into whatever codec you want.
7B. Sony Vegas to Separate Uncompressed Video and Audio for x264 or Xvid:
I use Vegas 5, just for reference. Newer versions might be slightly different.
One thing you'll want to know about x264 encoding is that the resolution (both width and height) has to be divisible by 16. If you've been using 800x600, I'd just resize your video to 800x592. You should take this into account before you edit.
After you're done editing:
- File > Render As...
Now in your "Render As" window:
- Template: Default Template (uncompressed)
- Save as type: Video for Windows (.avi)
Then click on the "Custom" button. In your "Custom Template" Window:
- Project tab > Video Rendering Quality: Preview (this will prevent deinterlacing and you will not lose any quality)
- Audio Tab > Uncheck "Include Audio" box
- Hit okay. Name it what you want, and hit save.
This is your master video file. It's uncompressed and you can encode it into whatever codec you want.
After that's done, you'll need to produce the uncompressed audio file:
- File > Render As...
Now in your "Render As" window:
- Template: Default Template
- Save as type: Wave (Microsoft) (.wav)
- Hit okay. Name it what you want (preferably the same as the video), and hit save.
This is your master audio file. It's uncompressed and you can encode it into whatever codec you want.
7C. Adobe Premiere to Combined Uncompressed Video and Audio for wmv:
I don't use this program. This laptop came with premiere elements, and I'm basing this guide off of it. Your version might be different, but you'll get the idea of what you wanna do. I use vegas so yeah =/.
After you're done editing:
- File > Export > Movie... > Settings
Okay now you'll have a window opened called "Export Movie Settings."
There should be should be four categories on the left: General, Video, Keyframe and Rendering, and Audio. Now do this:
- General > File Type > Microsoft AVI
- Video > Compressor > Uncompressed
- Video > Frame size > whatever resolution you recorded at/want to render at
- Audio > Compressor > Uncompressed.
I don't know if you'll get deinterlacing on those settings or not (you don't want that), but that's the best I can do with a program I've never used lollll.
Hit okay and save it as what you want. This is your master file. It's uncompressed audio and video, and you can encode it into whatever codec you want.
7D. Adobe Premiere to Separate Uncompressed Video and Audio for x264 or Xvid :
I don't use this program. This laptop came with premiere elements, and I'm basing this guide off of it. Your version might be different, but you'll get the idea of what you wanna do. I use vegas so yeah =/.
After you're done editing:
- File > Export > Movie... > Settings
Okay now you'll have a window opened called "Export Movie Settings."
There should be should be four categories on the left: General, Video, Keyframe and Rendering, and Audio. Now do this:
- General > File Type > Microsoft AVI
- General > UNCHECK the "Export Audio" box
- Video > Compressor > Uncompressed
- Video > Frame size > whatever resolution you recorded at/want to render at
Hit okay and save it as what you want. This is your master video file. It's uncompressed and you can encode it into whatever codec you want.
After that's done, you'll need to produce the uncompressed audio file:
File > Export > Audio...
Name it what you want (preferably the same as the video), and hit save.
This is your master audio file. It's uncompressed and you can encode it into whatever codec you want.
8. Encoding:
8A. Windows Media Encoder for wmv:
WMV9 Codec:
Pros: Decent file size, good quality at any resolution. Very simple encoding process.
Cons: Toubles with color balance. Edges of reds can be lost, areas of green can be oversaturated.
- Open it up. A new session window will come up. Just hit cancel.
- Hit the properties button near the top.
- Sources Tab > Source From: File
- Sources Tab > File name > browse to your master file that you made in premiere/vegas
- Output Tab > Uncheck the Pull from Encoder Box
- Output Tab > Check the Encode to File box. Hit browse and save it as what you want
- Compression Tab > Destination > File download (computer playback)
- Video Size Tab > Blue re size text > Method: No resizing
- Processing > Pixel Format: YV12
- Hit apply. Then hit the green Start Encoding button near the top....
NOTE: This encodes @ 5mbps. Quality will be excellent, but you'll be sitting @ about 36-39MB/minute @ 800x600. Expect pretty large file sizes.
AND YOU'RE DONE.
8B. FAAC, MEGUI, and more for x264:
x264 Codec:
Pros: Lowest file size out of any codec, high quality at most resolutions.
Cons: Weaker in reds than Xvid. Slow encoding process.
For this section I'm assuming you're using my x264 pack and that you followed the readme.txt in it correctly. I'm also assuming that you exported an uncompressed video and audio file from vegas (section 7B) or premiere (section 7D).
This section is for advanced users. Some of the encoding will take place in the command line prompt. It's not that hard, but if you're not that great with computers you might want to overlook this and just encode in wmv.
Okay, you should have this folder filled with all your x264 files:
C:\Documents and Settings\username\x264
Put both your uncompressed .avi and uncompressed .wav in this folder. Make both of their names the same. You can decipher them by their file extensions.
Audio Encoding:
Start > Run > cmd
This is the command prompt. When I tell you to type something in it DON'T USE THE QUOTES.
The default directory should be:
C:\Documents and Settings\username
type "cd x264" and hit enter
Now your directory should be:
C:\Documents and Settings\username\x264
type "faac -w -b 128 audiofilename.wav" and hit enter.
Your audio file should encode pretty quickly.
You will now have a file called "audiofilename.m4a" in your C:\Documents and Settings\username\x264 folder. This is your compressed audio.
Video Encoding:
Remember, resolution (width and height) must be divisible by 16!
Right-Click in any white area in your C:\Documents and Settings\username\x264 folder > New > Text Document.
Rename it to: videofilename.avs
Windows will ask you if you want to change the file type. Say yes.
Open up the file (it won't know what program to use. Just do Chose Program from List and use notepad). Put this in the body:
AVISource("videofilename.avi")
Crop(0,0,-0,-0)
ConvertToYV12()
Save it and close it.
Open up megui.exe.
Input Tab under Video Encoding:
Codec > x264
File Type > MP4
Across from AviSynth Script click on the "..." Button. Browse to: C:\Documents and Settings\username\x264 and click on videofilename.avs.
A new window should open up with the video file. You don't need to do anything there. Just close it.
Back in your main window, hit Config.
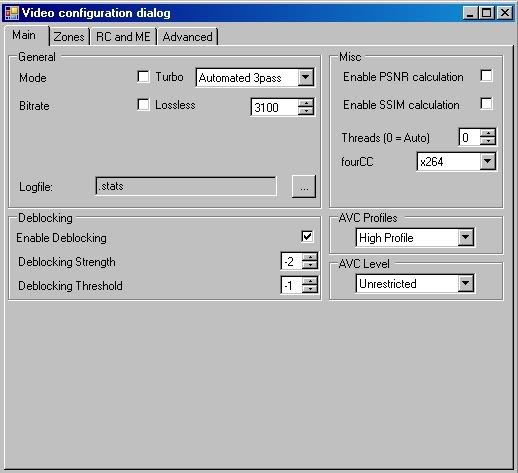
The first thing you MUST do is set your "AVC Profiles" to "High Profile"
Then, use these settings for your main tab:
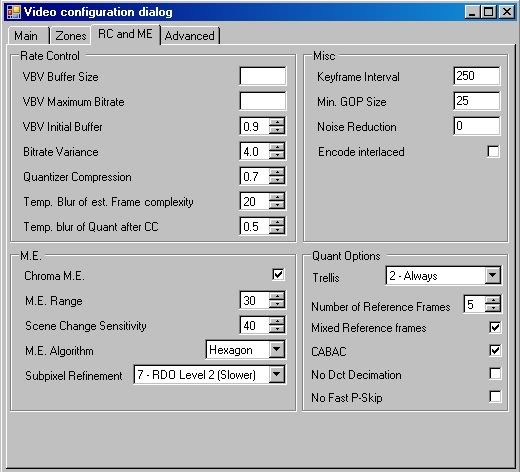
For your RC and ME tab, use these settings:
For you advanced tab, use these settings:
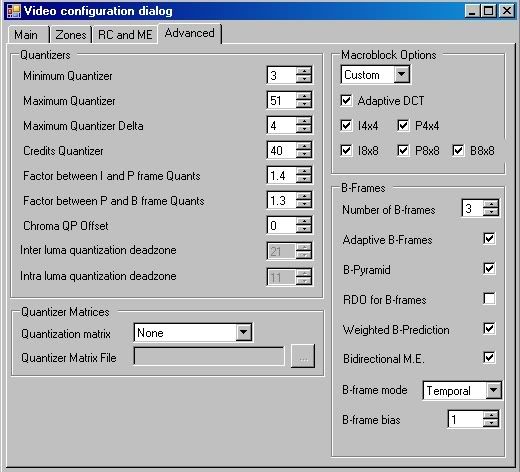
Note: I can't guarentee good quality or smooth playback with these settings. x264 is tricky. Every video is different. Currently I get about 23 MB/minute with amazing quality @ 800x600 with these settings. You might need to raise/lower the bitrate depending on resolution.
Hit okay. Then back in your main window, hit Enqueue below the config button. Go to the queue tab and hit start.
Encoding in x264 takes a VERY long time. Be patient. After you're done encoding, you'll have a file named "videofilename.mp4" in your C:\Documents and Settings\username\x264 folder. This is your compressed video file.
Muxing (combining your video and audio):
Open up YAMB.
Across from Audio and Video in blue text hit add. Add both your audiofilename.m4a and your videofilename.mp4 files. For the final time, THEY MUST HAVE THE SAME NAME OR YOU WILL GET ERRORS.
Down in the bottom right hit mux. Save it as what you want and hit okay.
AND YOU'RE DONE.
I'd like some feedback on the quality and mb/minute you guys are getting with those settings.
8C. LAME, VirtualDubMod, and more for Xvid:
Xvid MPEG-Layer 4 Codec:
Pros: Low file size, high quality at any resolution, accurate colors all around.
Cons: None.
For this section I'm assuming you're using my Xvid pack and that you followed the readme.txt in it correctly. I'm also assuming that you exported an uncompressed video and audio file from vegas (section 7B) or premiere (section 7D).
This section is for advanced users. Some of the encoding will take place in the command line prompt. It's not that hard, but if you're not that great with computers you might want to overlook this and just encode in wmv.
Okay, you should have this folder filled with all your Xvid files:
C:\Documents and Settings\username\xvid
Put both your uncompressed .avi and uncompressed .wav in this folder. Make both of their names the same. You can decipher them by their file extentions.
Audio Encoding:
Start > Run > cmd
This is the command prompt. When I tell you to type something in it DON'T USE THE QUOTES.
The default directory should be:
C:\Documents and Settings\username
type "cd xvid" and hit enter
Now your directory should be:
C:\Documents and Settings\username\xvid
type "lame audiofilename.wav audiofilename.mp3" and hit enter.
Your audio file should encode pretty quickly.
You will now have a file called "audiofilename.mp3" in your C:\Documents and Settings\username\xvid folder. This is your compressed audio.
Video Encoding:
Remember, resolution (width and height) must be divisible by 2!
Right-Click in any white area in your C:\Documents and Settings\username\xvid folder > New > Text Document.
Rename it to: videofilename.avs
Windows will ask you if you want to change the file type. Say yes.
Open up the file (it won't know what program to use. Just do Chose Program from List and use notepad). Put this in the body:
AVISource("videofilename.avi")
Crop(0,0,-0,-0)
ConvertToYV12()
Save it and close it.
Open up VirtualDubMod.exe:
-File > Open Video File > Browse to your videofilename.avs file.
-Streams > Steam List > Add > Browse to your audiofilename.mp3 file.
-Video > Compression > Select Xvid MPEG-4 Codec. Hit Configure.
In your XviD Configuration Window:
-Profile @ Level: (unrestricted). Hit the more... button to the right of it.
In the new window, use these settings:
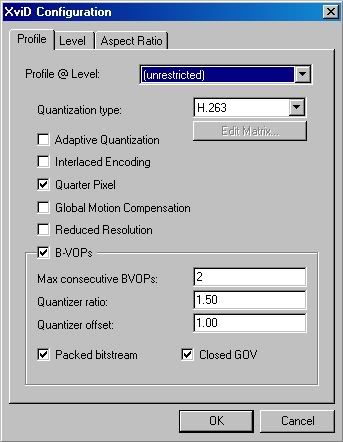
Hit okay. Back in your main XviD Configuration Window:
-Encoding Type: Twopass - 1st pass
Hit "Advanced Options..."
In new window's Motion tab, use these settings:
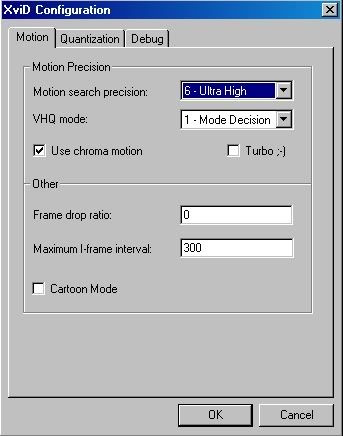
In the Quantization tab, use these settings:
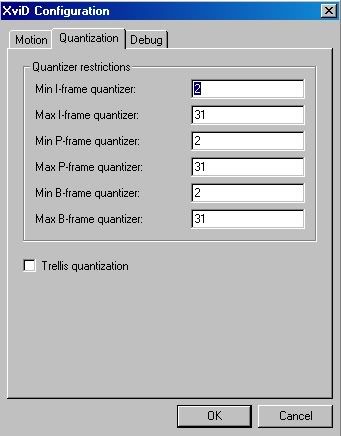
Hit Okay. Okay. Okay.
Back in your VirtualDubMod Main Window:
-File > Save As (F7) > CHECK "Don't run this job now; add it to Job Control so I can run it in batch mode." Save it as "firstpass.avi" in your C:\Documents and Settings\username\xvid folder.
Back in your VirtualDubMod Main Window:
-Video > Compression > Select Xvid MPEG-4 Codec. Hit Configure.
In your XviD Configuration Window:
-Encoding Type: Twopass - 2nd pass
-Target Bitrate: 4500-5000 (I use 4900, depends on video resolution. You can find an optimal bitrate using the XviD bitrate calculator. The higher the resolution, the higher bitrate you'll need)
If it says "Target Size (kbytes)" instead of "Target Bitrate (kbps)," just click on the "Target Size (kbytes)" text and it will switch to "Target Bitrate (kbps)."
Hit okay. Okay.
Back in your VirtualDubMod Main Window:
-File > Save As (F7) > CHECK "Don't run this job now; add it to Job Control so I can run it in batch mode." Save it as "secondpass.avi" in your C:\Documents and Settings\username\xvid folder.
-File > Job Control (F4) > Start
There will be a firstpass.avi and a secondpass.avi in your C:\Documents and Settings\username\xvid folder. The secondpass.avi is your finalized project.
AND YOU'RE DONE.
----------------------------------------------
1. Movie Config
2. HQ Movie Files
3. Before You Get Started
A. Separate CSS Icons
B. Enabling Visible File Extensions
C. Windows Sound Settings
D. Video Card Driver Settings
--Nvidia
--ATI
4. Encoding and Compiling Files Section
-Includes Links to All Freeware:
--VirtualDub
--Windows Media Encoder
--HuffYUV
--VLC Media Player (x264 Playback)
--x264 Encoding File Pack by anX
--Xvid Encoding File Pack by anX
5. Recording in CS:S
6. Screenshots to avi in VirtualDub
7. Editing Program to Uncompressed Master File(s)
A. Sony Vegas to Combined Uncompressed Video and Audio for wmv
B. Sony Vegas to Separate Uncompressed Video and Audio for x264 or Xvid
C. Adobe Premiere to Combined Uncompressed Video and Audio for wmv
D. Adobe Premiere to Separate Uncompressed Video and Audio for x264 or Xvid
8. Encoding
A. Windows Media Encoder for wmv
B. FAAC, MEGUI, and more for x264
C. LAME, VirtualDubMod, and more for Xvid
1. Movie Config v2.3:
Download: http://files.filefront.com/movieconf.../fileinfo.html
I definately spent the most time working on this. It contains all your basic movie commands (hides radar, text, all that), sets all your settings on high, and has a lot of common binds already set up for you. You can toggle wireframe, mat_proxy, hud, radar, spectator bars, you name it.
Screenshot of Console Menu:

2. HQ Movie Files v4:
Download: http://www.filefront.com/16774927/cssmoviefiles-anXv4.rar
This movie pack contains the following:
1. A modified version of Fragalicious' HUD remover (www.csflicks.net). The original changed the kill notice text and
gave it a shadow. I changed it back to default.
2. The materials folder and blue LED bomblight from ARN's CSS Movie Making GUI. I did not include the GUI's hud remover because the clientscheme.res changed too many in-game texts. The materials folder includes high quality textures, better explosions, and much more. Along with it comes a custom movie making background and a custom movie GUI.
3. Spectator bar removal for POV demos. These are NOT recommended for sourcetv demos, because you can toggle the bars with the movie config. Read the installation section in the readmeon how to enable/disable the spec bar removal.
These files will remove the HUD in CSS and make your game look downright sexy when used with the movie.cfg. It took a while to modify them so the texts in the game are all default, but I think I got it figured out.
NOTE: The HUD toggles in the movie.cfg will not work with these files in use. The HUD is permantly off when using the new scripts and resource folder.
I am not the original creator of the resource, materials, or scripts folder in this pack. I only modified them so that the game had all default texts with maximum settings and high quality materials.
NOTE: After the recent sv_pure update, the high quality materials of these movie files no longer work. The hud remover, however, works just fine.
3. Before You Get Started:
3A. Separate CSS Icons
I recommend using two separate CSS icons on your desktop: one for playing and one for making movies. I would also recommend NOT using an autoexec. Why? Well, you don't want stuff loading from your autoexec as you make movies, and vice versa. If you don't use an autoexec, skip this and go onto "Things you'll want/need."
So, here's what I do. Go to your cstrike/cfg. Open up your config.cfg. Back up any personal commands, then completely empty it. Save it and close the window. Then right click on the file > properties > check the "Read-Only" box. This will prevent things from the movie config saving into there.
Then rename your autoexec.cfg to play.cfg. Make sure you have ALL of your binds in there (for movement and everything).
Now we go to launch options in your two CSS desktop icons. I'll be using defaults for resolution. Change the -w and -h to whatever your res is. You can also change the dxlevel in your play icon to whatever you usually use.
For your play CSS icon:
-fullscreen -w 1024 -h 768 -dxlevel 80 +exec play
For your movie CSS icon:
-windowed -w 800 -h 600 -dxlevel 95 +exec movie
Example:
3B. Enabling Visible File Extenstions
Also, I HIGHLY HIGHLY HIGLY recommend enabling file visible file extensions in windows. Actually, it's required for x264 encoding, so just go ahead and do it.
Control Panel (in classic view) > Folder Options > View Tab:
Uncheck that box.
3C. Windows Sound Settings
CS:S cannot record surround sound audio. If your audio settings are at 5.1/7.1, the audio file you record will be 0 kb. I recommend using Two Speaker settings. Not only will your audio record, but this is the best audio setting to play at BY FAR unless you're using 5.1/7.1 headphones.
Control Panel (in Classic View) > Sounds and Audio Devices > Volume Tab > Advanced (under Speaker Settings) > Set your Speaker Setup to "Desktop Stereo Speakers"
3D. Video Card Driver Settings
CS:S does not contain commands for maximum AF/AA. For example, the maximum Filtering command in CS:S is mat_trillinear 1. Any mainstream card made in the past couple years can support higher AF than trillinear. Thus, it is best to force maximum settings in your video card drivers
Nvidia (Forceware 84.26):
Right click on your desktop > Nvidia Display > "monitor name" > "video card name" > Performance and Quality Settings: Turn everything up to its maximum, and uncheck any box that says "Let the application decide."
I know these aren't the newest drivers, but newer ones cause some problems with my PC. You should get the idea of what you want to do.
ATI (Catalyst Control Center):
Right Click on your Desktop > ATI Catalyst Control Center > 3D > All settings: Turn everything up to its maximum (excluding Catalyst AI and Smartshader Effects), and uncheck any box that says "Let the application decide."
4. Encoding and Compiling Files Section:
Required non-free Software:
-Counter-Strike: Source
-Sony Vegas or Adobe Premiere (I use Vegas 5)
Freeware:
-VirtualDub (I use version 1.5.10) Download: http://www.oldversion.com/program.php?n=virtualdub
-Windows Media Encoder (for easy wmv files) Download: HERE
-HuffYUV Codec for Lossless Compression Download: http://www.divx-digest.com/software/huffyuv.html
-VLC Media Player (x264 playback) Download: http://www.videolan.org/vlc/
-x264 Encoding Pack by anX Download: HERE
Contents:
---AVISynth 2.5.7
---YAMB 1.6
---FAAC.exe
---meGUI x264 specific version
---meGUI new version (multiple codecs)
---MP4Box.exe
---x264.exe
---A bunch of dlls and other files THAT YOU MUST KEEP IN THE SAME FILE AS THE .exe's.
-Xvid Encoding Pack by anX Download: HERE
Contents:
---AVISynth 2.5.7
---Xvid 1.0 (newer versions are without a few options)
---Xvid Bitrate Calculator
---LAME.exe
---Multifrontend.exe
---VirtualDub 1.5.10
---VirtualDubMod 1.5.10
---A bunch of dlls and other files THAT YOU MUST KEEP IN THE SAME FILE AS THE .exe's.
Optional Sofware:
-Adobe Photoshop
-Adobe After Effects
-3DS Max
-Particle Illusion
5. Recording in CS:S:
After executing the config:
- Hit the down arrow on your keypad to set your capturing rate @ 90 fps (or chose whatever framerate you want).
- Hit F11 to start recording. Hit F12 to stop recording.
- After recording a clip, hit control (host_framerate 0) for functional demoui speed control. Before you record your next clip, don't forget to hit the down arrow key again (or whatever framerate key you used).
All of that stuff should be in your console on the menu I made...
Now there will be a ton of .tgas and one .wav file in your cstrike folder all named a (or b or c or whatever letter you were on. You can record up to 26 times with F11 in one execution of the config. Nothing will ever get overwritten unless you re-exec the config).
Now close css and open up virtualdub.
6. Screenshots to avi in VirtualDub:
With virtualdub open:
- File > Open video file > click on the first ss in your cstrike folder (the whole series will open up
- Video > Framerate > change to whatever framerate you recorded at (90)
- Video > Color depth > decompression format: 24 bit, output format to compressor/display: 24 bit
- Video > compression > uncompressed OR HuffYUV (files section, lossless codec, no quality loss but output size will be less than half than that of uncompressed avi)
- Video > Full Processing Mode
- Audo > WAV audio > browse to your wav file in your cstrike folder
- Audio > Full Processing Mode
- Audio > Compression > Uncompressed
- File > Save as AVI
Done.
7. Editing Program to Uncompressed Master File(s)
7A. Sony Vegas to Combined Uncompressed Video and Audio for wmv:
I use Vegas 5, just for reference. Newer versions might be slightly different.
After you're done editing:
- File > Render As...
Now in your "Render As" window:
- Template: Default Template (uncompressed)
- Save as Type: Video for Windows (.avi)
Then click on the "Custom" button. In your "Custom Template" Window:
- Project tab > Video Rendering Quality: Preview (this will prevent deinterlacing and you will not lose any quality)
- Hit okay. Name it what you want, and hit save.
This is your master file. It's uncompressed audio and video, and you can encode it into whatever codec you want.
7B. Sony Vegas to Separate Uncompressed Video and Audio for x264 or Xvid:
I use Vegas 5, just for reference. Newer versions might be slightly different.
One thing you'll want to know about x264 encoding is that the resolution (both width and height) has to be divisible by 16. If you've been using 800x600, I'd just resize your video to 800x592. You should take this into account before you edit.
After you're done editing:
- File > Render As...
Now in your "Render As" window:
- Template: Default Template (uncompressed)
- Save as type: Video for Windows (.avi)
Then click on the "Custom" button. In your "Custom Template" Window:
- Project tab > Video Rendering Quality: Preview (this will prevent deinterlacing and you will not lose any quality)
- Audio Tab > Uncheck "Include Audio" box
- Hit okay. Name it what you want, and hit save.
This is your master video file. It's uncompressed and you can encode it into whatever codec you want.
After that's done, you'll need to produce the uncompressed audio file:
- File > Render As...
Now in your "Render As" window:
- Template: Default Template
- Save as type: Wave (Microsoft) (.wav)
- Hit okay. Name it what you want (preferably the same as the video), and hit save.
This is your master audio file. It's uncompressed and you can encode it into whatever codec you want.
7C. Adobe Premiere to Combined Uncompressed Video and Audio for wmv:
I don't use this program. This laptop came with premiere elements, and I'm basing this guide off of it. Your version might be different, but you'll get the idea of what you wanna do. I use vegas so yeah =/.
After you're done editing:
- File > Export > Movie... > Settings
Okay now you'll have a window opened called "Export Movie Settings."
There should be should be four categories on the left: General, Video, Keyframe and Rendering, and Audio. Now do this:
- General > File Type > Microsoft AVI
- Video > Compressor > Uncompressed
- Video > Frame size > whatever resolution you recorded at/want to render at
- Audio > Compressor > Uncompressed.
I don't know if you'll get deinterlacing on those settings or not (you don't want that), but that's the best I can do with a program I've never used lollll.
Hit okay and save it as what you want. This is your master file. It's uncompressed audio and video, and you can encode it into whatever codec you want.
7D. Adobe Premiere to Separate Uncompressed Video and Audio for x264 or Xvid :
I don't use this program. This laptop came with premiere elements, and I'm basing this guide off of it. Your version might be different, but you'll get the idea of what you wanna do. I use vegas so yeah =/.
After you're done editing:
- File > Export > Movie... > Settings
Okay now you'll have a window opened called "Export Movie Settings."
There should be should be four categories on the left: General, Video, Keyframe and Rendering, and Audio. Now do this:
- General > File Type > Microsoft AVI
- General > UNCHECK the "Export Audio" box
- Video > Compressor > Uncompressed
- Video > Frame size > whatever resolution you recorded at/want to render at
Hit okay and save it as what you want. This is your master video file. It's uncompressed and you can encode it into whatever codec you want.
After that's done, you'll need to produce the uncompressed audio file:
File > Export > Audio...
Name it what you want (preferably the same as the video), and hit save.
This is your master audio file. It's uncompressed and you can encode it into whatever codec you want.
8. Encoding:
8A. Windows Media Encoder for wmv:
WMV9 Codec:
Pros: Decent file size, good quality at any resolution. Very simple encoding process.
Cons: Toubles with color balance. Edges of reds can be lost, areas of green can be oversaturated.
- Open it up. A new session window will come up. Just hit cancel.
- Hit the properties button near the top.
- Sources Tab > Source From: File
- Sources Tab > File name > browse to your master file that you made in premiere/vegas
- Output Tab > Uncheck the Pull from Encoder Box
- Output Tab > Check the Encode to File box. Hit browse and save it as what you want
- Compression Tab > Destination > File download (computer playback)
- Video Size Tab > Blue re size text > Method: No resizing
- Processing > Pixel Format: YV12
- Hit apply. Then hit the green Start Encoding button near the top....
NOTE: This encodes @ 5mbps. Quality will be excellent, but you'll be sitting @ about 36-39MB/minute @ 800x600. Expect pretty large file sizes.
AND YOU'RE DONE.
8B. FAAC, MEGUI, and more for x264:
x264 Codec:
Pros: Lowest file size out of any codec, high quality at most resolutions.
Cons: Weaker in reds than Xvid. Slow encoding process.
For this section I'm assuming you're using my x264 pack and that you followed the readme.txt in it correctly. I'm also assuming that you exported an uncompressed video and audio file from vegas (section 7B) or premiere (section 7D).
This section is for advanced users. Some of the encoding will take place in the command line prompt. It's not that hard, but if you're not that great with computers you might want to overlook this and just encode in wmv.
Okay, you should have this folder filled with all your x264 files:
C:\Documents and Settings\username\x264
Put both your uncompressed .avi and uncompressed .wav in this folder. Make both of their names the same. You can decipher them by their file extensions.
Audio Encoding:
Start > Run > cmd
This is the command prompt. When I tell you to type something in it DON'T USE THE QUOTES.
The default directory should be:
C:\Documents and Settings\username
type "cd x264" and hit enter
Now your directory should be:
C:\Documents and Settings\username\x264
type "faac -w -b 128 audiofilename.wav" and hit enter.
Your audio file should encode pretty quickly.
You will now have a file called "audiofilename.m4a" in your C:\Documents and Settings\username\x264 folder. This is your compressed audio.
Video Encoding:
Remember, resolution (width and height) must be divisible by 16!
Right-Click in any white area in your C:\Documents and Settings\username\x264 folder > New > Text Document.
Rename it to: videofilename.avs
Windows will ask you if you want to change the file type. Say yes.
Open up the file (it won't know what program to use. Just do Chose Program from List and use notepad). Put this in the body:
AVISource("videofilename.avi")
Crop(0,0,-0,-0)
ConvertToYV12()
Save it and close it.
Open up megui.exe.
Input Tab under Video Encoding:
Codec > x264
File Type > MP4
Across from AviSynth Script click on the "..." Button. Browse to: C:\Documents and Settings\username\x264 and click on videofilename.avs.
A new window should open up with the video file. You don't need to do anything there. Just close it.
Back in your main window, hit Config.
The first thing you MUST do is set your "AVC Profiles" to "High Profile"
Then, use these settings for your main tab:
For your RC and ME tab, use these settings:
For you advanced tab, use these settings:
Note: I can't guarentee good quality or smooth playback with these settings. x264 is tricky. Every video is different. Currently I get about 23 MB/minute with amazing quality @ 800x600 with these settings. You might need to raise/lower the bitrate depending on resolution.
Hit okay. Then back in your main window, hit Enqueue below the config button. Go to the queue tab and hit start.
Encoding in x264 takes a VERY long time. Be patient. After you're done encoding, you'll have a file named "videofilename.mp4" in your C:\Documents and Settings\username\x264 folder. This is your compressed video file.
Muxing (combining your video and audio):
Open up YAMB.
Across from Audio and Video in blue text hit add. Add both your audiofilename.m4a and your videofilename.mp4 files. For the final time, THEY MUST HAVE THE SAME NAME OR YOU WILL GET ERRORS.
Down in the bottom right hit mux. Save it as what you want and hit okay.
AND YOU'RE DONE.
I'd like some feedback on the quality and mb/minute you guys are getting with those settings.
8C. LAME, VirtualDubMod, and more for Xvid:
Xvid MPEG-Layer 4 Codec:
Pros: Low file size, high quality at any resolution, accurate colors all around.
Cons: None.
For this section I'm assuming you're using my Xvid pack and that you followed the readme.txt in it correctly. I'm also assuming that you exported an uncompressed video and audio file from vegas (section 7B) or premiere (section 7D).
This section is for advanced users. Some of the encoding will take place in the command line prompt. It's not that hard, but if you're not that great with computers you might want to overlook this and just encode in wmv.
Okay, you should have this folder filled with all your Xvid files:
C:\Documents and Settings\username\xvid
Put both your uncompressed .avi and uncompressed .wav in this folder. Make both of their names the same. You can decipher them by their file extentions.
Audio Encoding:
Start > Run > cmd
This is the command prompt. When I tell you to type something in it DON'T USE THE QUOTES.
The default directory should be:
C:\Documents and Settings\username
type "cd xvid" and hit enter
Now your directory should be:
C:\Documents and Settings\username\xvid
type "lame audiofilename.wav audiofilename.mp3" and hit enter.
Your audio file should encode pretty quickly.
You will now have a file called "audiofilename.mp3" in your C:\Documents and Settings\username\xvid folder. This is your compressed audio.
Video Encoding:
Remember, resolution (width and height) must be divisible by 2!
Right-Click in any white area in your C:\Documents and Settings\username\xvid folder > New > Text Document.
Rename it to: videofilename.avs
Windows will ask you if you want to change the file type. Say yes.
Open up the file (it won't know what program to use. Just do Chose Program from List and use notepad). Put this in the body:
AVISource("videofilename.avi")
Crop(0,0,-0,-0)
ConvertToYV12()
Save it and close it.
Open up VirtualDubMod.exe:
-File > Open Video File > Browse to your videofilename.avs file.
-Streams > Steam List > Add > Browse to your audiofilename.mp3 file.
-Video > Compression > Select Xvid MPEG-4 Codec. Hit Configure.
In your XviD Configuration Window:
-Profile @ Level: (unrestricted). Hit the more... button to the right of it.
In the new window, use these settings:
Hit okay. Back in your main XviD Configuration Window:
-Encoding Type: Twopass - 1st pass
Hit "Advanced Options..."
In new window's Motion tab, use these settings:
In the Quantization tab, use these settings:
Hit Okay. Okay. Okay.
Back in your VirtualDubMod Main Window:
-File > Save As (F7) > CHECK "Don't run this job now; add it to Job Control so I can run it in batch mode." Save it as "firstpass.avi" in your C:\Documents and Settings\username\xvid folder.
Back in your VirtualDubMod Main Window:
-Video > Compression > Select Xvid MPEG-4 Codec. Hit Configure.
In your XviD Configuration Window:
-Encoding Type: Twopass - 2nd pass
-Target Bitrate: 4500-5000 (I use 4900, depends on video resolution. You can find an optimal bitrate using the XviD bitrate calculator. The higher the resolution, the higher bitrate you'll need)
If it says "Target Size (kbytes)" instead of "Target Bitrate (kbps)," just click on the "Target Size (kbytes)" text and it will switch to "Target Bitrate (kbps)."
Hit okay. Okay.
Back in your VirtualDubMod Main Window:
-File > Save As (F7) > CHECK "Don't run this job now; add it to Job Control so I can run it in batch mode." Save it as "secondpass.avi" in your C:\Documents and Settings\username\xvid folder.
-File > Job Control (F4) > Start
There will be a firstpass.avi and a secondpass.avi in your C:\Documents and Settings\username\xvid folder. The secondpass.avi is your finalized project.
AND YOU'RE DONE.
Subscribe to:
Posts (Atom)